> ## Documentation Index
> Fetch the complete documentation index at: https://docs.comfy.org/llms.txt
> Use this file to discover all available pages before exploring further.
# ComfyUI-Manager Installation
> Install ComfyUI-Manager on Desktop, Portable, or manual ComfyUI setups to search, install, and update custom nodes from inside the app.
## Desktop users
Comfy Desktop installs ComfyUI-Manager with every ComfyUI installation and starts it with `--enable-manager`, so there is nothing for you to install. Manager is configured per installation from inside the app:
In Comfy Desktop, open the installation and go to the **Manage panel**, then switch to the **Startup Args** tab.
* **Manager Security Level** decides which node packs Manager may install: **Strict**, **Standard** (recommended), **Relaxed**, or **Permissive**. Stricter levels matter most when ComfyUI is exposed to your network with `--listen`
* **Manager Network Mode** decides how Manager reaches the node registry: **Public** (default), **Private**, **Offline**, or **Personal cloud** (only for a machine you control)
Both options apply the next time you launch the installation.
**Startup Arguments** on the same tab controls the flags the installation launches with. Remove `--enable-manager` to run ComfyUI without Manager, or keep it and add `--disable-manager-ui` to hide the Manager UI while its background tasks continue.
See the [Startup Args tab](/installation/desktop/usage/manage#startup-args-tab) for the rest of the per-installation settings and the [startup flags reference](/development/comfyui-server/startup-flags) for the Manager flags.
## Portable users
For users running the [Windows Portable](/installation/comfyui_portable_windows) version, the new ComfyUI-Manager is built into ComfyUI core but needs to be enabled.
1. Install the manager dependencies:
```bash theme={null}
.\python_embeded\python.exe -m pip install -r ComfyUI\manager_requirements.txt
```
2. Launch ComfyUI with the manager enabled:
```bash theme={null}
.\python_embeded\python.exe -s ComfyUI\main.py --windows-standalone-build --enable-manager
pause
```
## Manual install users
For users with a [manual installation](/installation/manual_install), the new ComfyUI-Manager is built into ComfyUI core but needs to be enabled.
1. Activate your virtual environment:
```bash theme={null}
# Windows
venv\Scripts\activate
# Linux/macOS
source venv/bin/activate
```
2. Install the manager dependencies:
```bash theme={null}
pip install -r manager_requirements.txt
```
3. Enable the manager with the `--enable-manager` flag when running ComfyUI:
```bash theme={null}
python main.py --enable-manager
```
### Command line options
| Flag | Description |
| - | - |
| `--enable-manager` | Enable ComfyUI-Manager |
| `--enable-manager-legacy-ui` | Use the legacy manager UI instead of the new UI (requires `--enable-manager`) |
| `--disable-manager-ui` | Disable the manager UI and endpoints while keeping background features (requires `--enable-manager`) |
### Switch between new and legacy UI
The following version updates only support pip installations. Versions installed via custom nodes do not support switching to the new UI.
To use the new UI:
```bash theme={null}
python main.py --enable-manager
```
To use the legacy UI:
```bash theme={null}
python main.py --enable-manager --enable-manager-legacy-ui
```
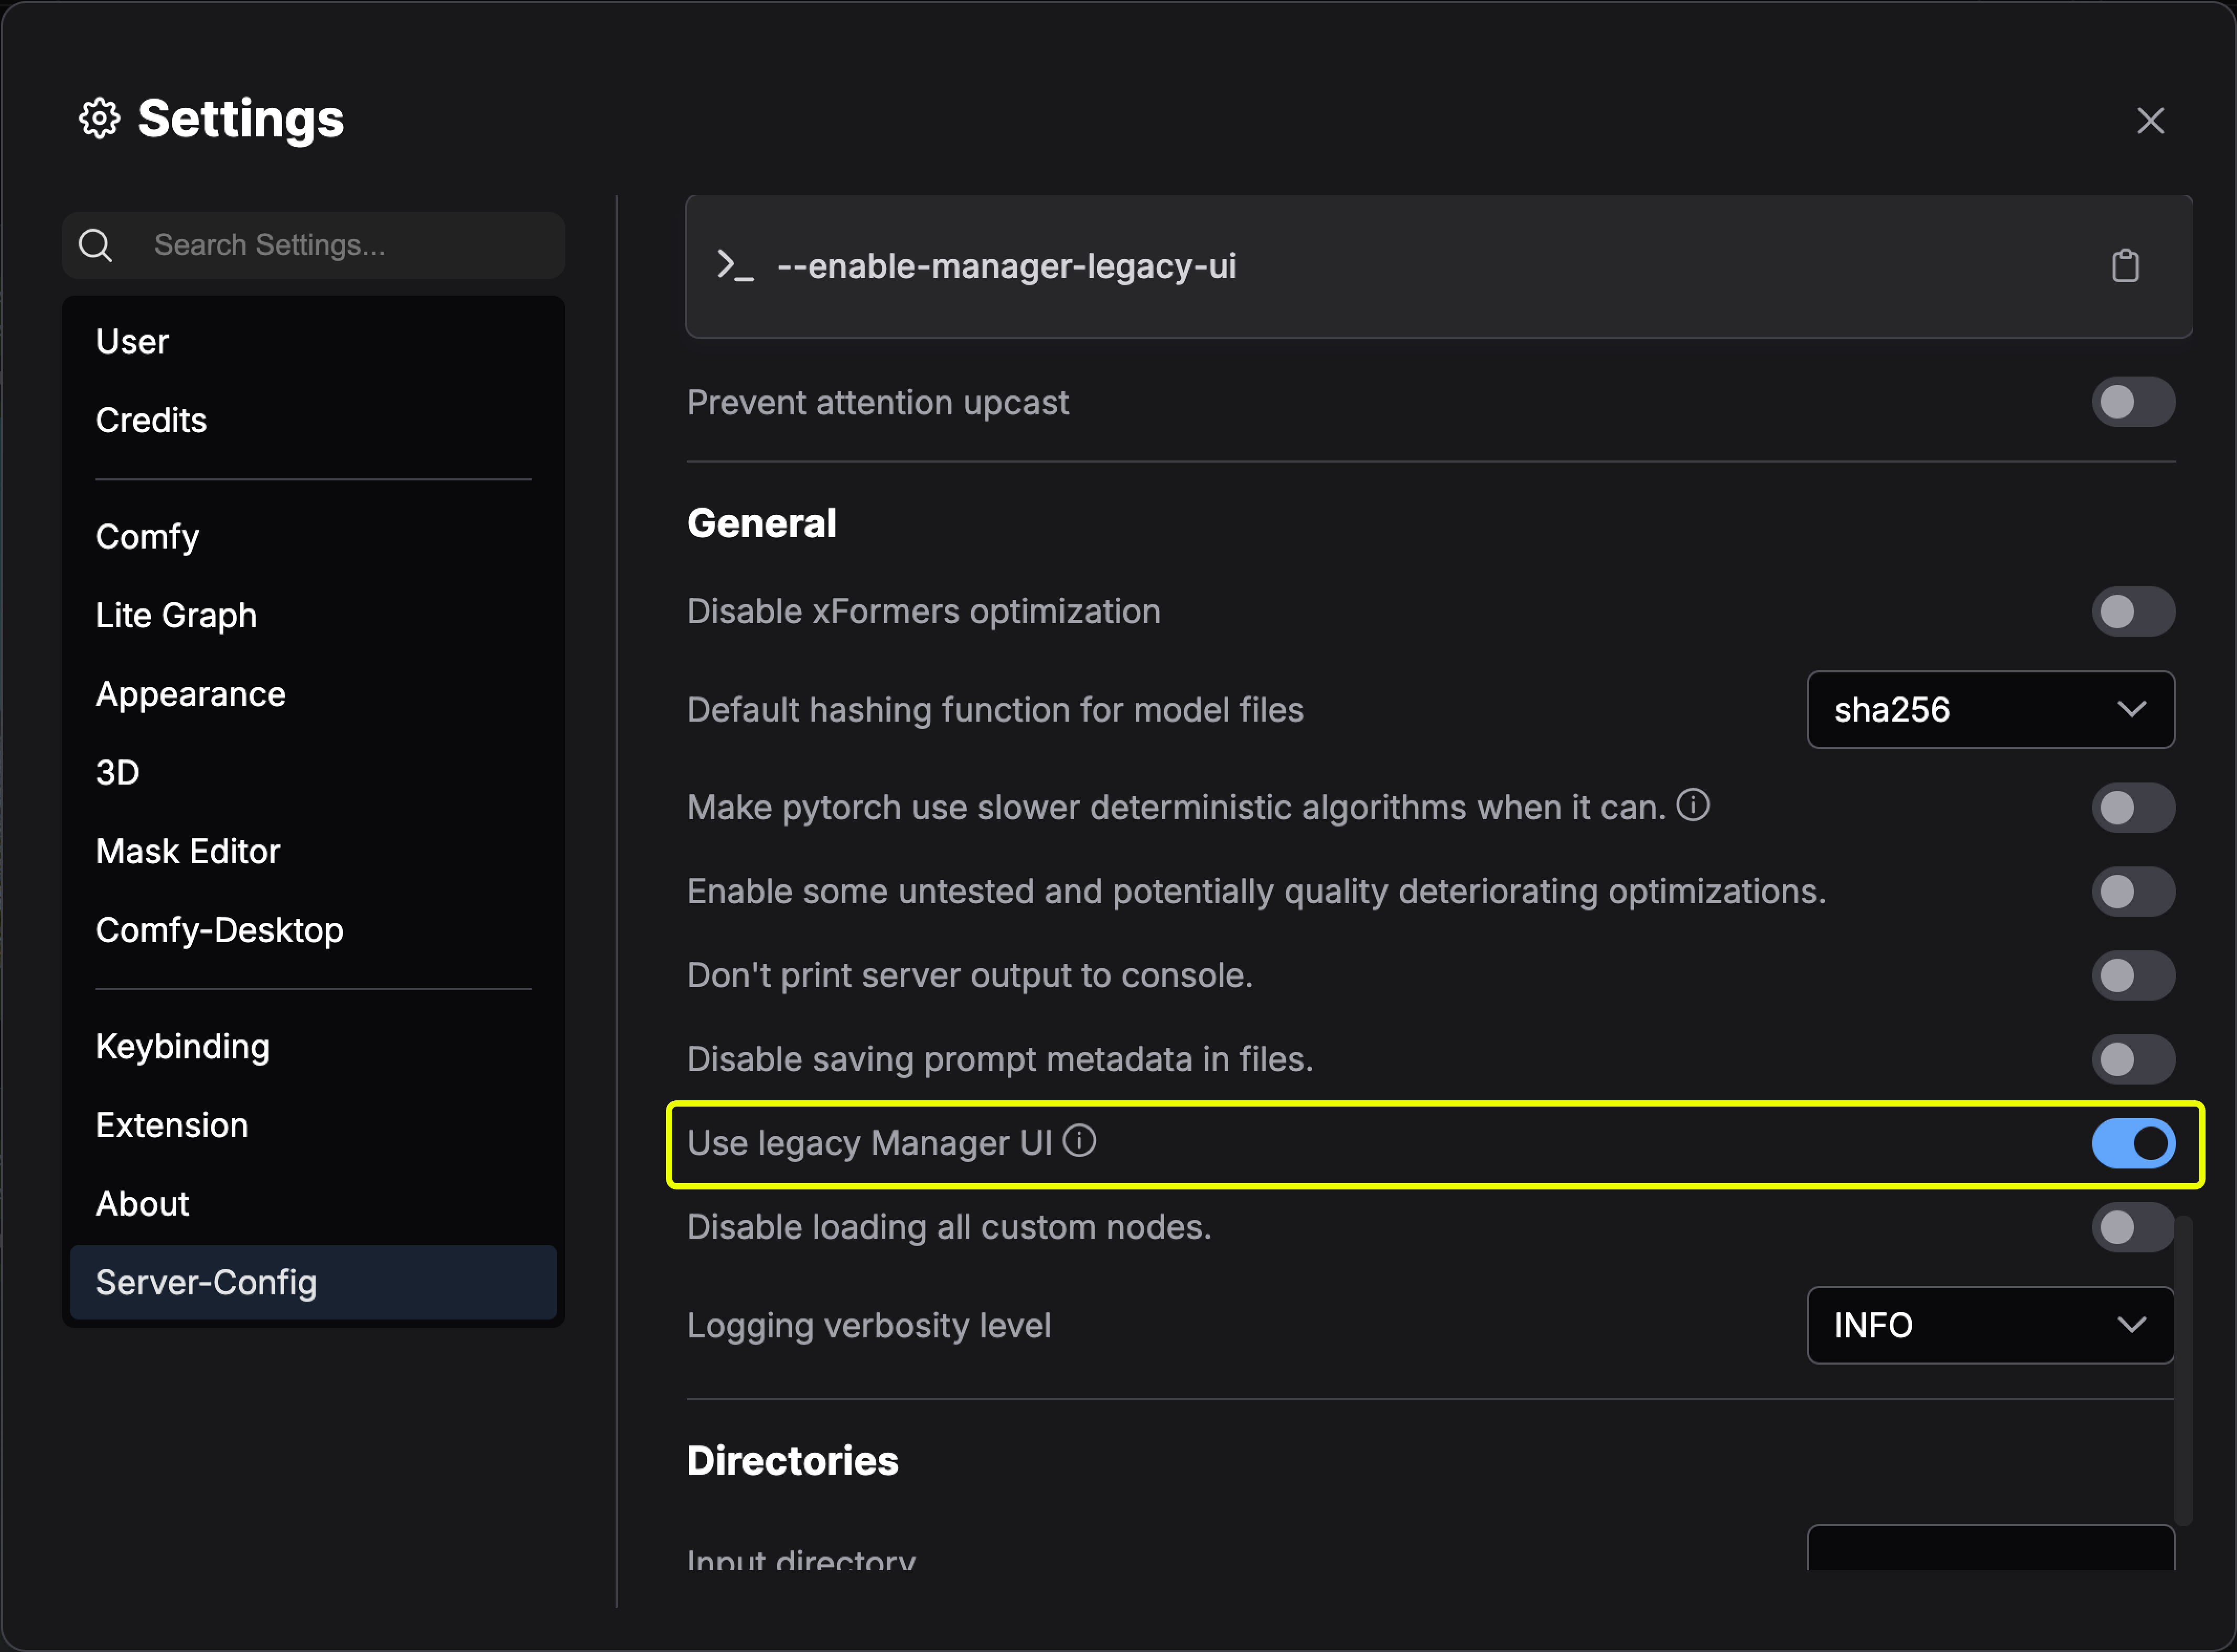
Desktop users can switch to the legacy UI in **Server Settings → UI Settings → Use legacy manager interface**
 ## Updating ComfyUI-Manager
ComfyUI-Manager ships as its own Python package, and ComfyUI core pins the version it works with in `manager_requirements.txt`. How you update the Manager depends on how ComfyUI is installed:
Desktop includes the Manager and keeps it current with Comfy Desktop updates. Update the ComfyUI engine from the [Manage panel](/installation/desktop/usage/manage#update-tab).
Updating ComfyUI may leave the installed Manager package unchanged. Install the manager requirements in the environment you launch ComfyUI from, then restart ComfyUI with `--enable-manager`:
```bash theme={null}
# Portable (Windows)
.\python_embeded\python.exe -m pip install -r ComfyUI\manager_requirements.txt
.\python_embeded\python.exe -s ComfyUI\main.py --windows-standalone-build --enable-manager
# Manual install
pip install -r manager_requirements.txt
python main.py --enable-manager
```
If you cloned the Manager into `custom_nodes` yourself:
```bash theme={null}
cd ComfyUI/custom_nodes/comfyui-manager
git pull
```
Then restart ComfyUI.
## Legacy installation methods
To install ComfyUI-Manager in addition to an existing installation of ComfyUI:
1. Navigate to `ComfyUI/custom_nodes` directory in terminal
2. Clone the repository:
```bash theme={null}
git clone https://github.com/Comfy-Org/ComfyUI-Manager comfyui-manager
```
3. Install the manager dependencies:
```bash theme={null}
cd comfyui-manager
pip install -r requirements.txt
```
4. Restart ComfyUI
1. Install [Git for Windows](https://git-scm.com/download/win) (standalone version, select "use windows default console window")
2. Download [install-manager-for-portable-version.bat](https://github.com/Comfy-Org/ComfyUI-Manager/raw/main/scripts/install-manager-for-portable-version.bat) into your `ComfyUI_windows_portable` directory
3. Double-click the batch file to install
comfy-cli provides various features to manage ComfyUI from the CLI.
**Prerequisites**: Python 3, Git
**Windows:**
```bash theme={null}
python -m venv venv
venv\Scripts\activate
pip install comfy-cli
comfy install
```
**Linux/macOS:**
```bash theme={null}
python -m venv venv
. venv/bin/activate
pip install comfy-cli
comfy install
```
See also: [comfy-cli documentation](/comfy-cli/getting-started)
**Prerequisites**: python-is-python3, python3-venv, git
1. Download [install-comfyui-venv-linux.sh](https://github.com/comfy-org/ComfyUI-Manager/raw/main/scripts/install-comfyui-venv-linux.sh) into an empty install directory
2. Run:
```bash theme={null}
chmod +x install-comfyui-venv-linux.sh
./install-comfyui-venv-linux.sh
```
3. Execute ComfyUI with `./run_gpu.sh` or `./run_cpu.sh`
**Installation precautions:**
* ComfyUI-Manager files must be accurately located in the path `ComfyUI/custom_nodes/comfyui-manager`
* Do not decompress directly into `ComfyUI/custom_nodes` (files like `__init__.py` should not be in that directory)
* Do not install in paths like `ComfyUI/custom_nodes/ComfyUI-Manager/ComfyUI-Manager` or `ComfyUI/custom_nodes/ComfyUI-Manager-main`
This documentation is built and hosted on [Mintlify](https://mintlify.com), a developer documentation platform.
## Updating ComfyUI-Manager
ComfyUI-Manager ships as its own Python package, and ComfyUI core pins the version it works with in `manager_requirements.txt`. How you update the Manager depends on how ComfyUI is installed:
Desktop includes the Manager and keeps it current with Comfy Desktop updates. Update the ComfyUI engine from the [Manage panel](/installation/desktop/usage/manage#update-tab).
Updating ComfyUI may leave the installed Manager package unchanged. Install the manager requirements in the environment you launch ComfyUI from, then restart ComfyUI with `--enable-manager`:
```bash theme={null}
# Portable (Windows)
.\python_embeded\python.exe -m pip install -r ComfyUI\manager_requirements.txt
.\python_embeded\python.exe -s ComfyUI\main.py --windows-standalone-build --enable-manager
# Manual install
pip install -r manager_requirements.txt
python main.py --enable-manager
```
If you cloned the Manager into `custom_nodes` yourself:
```bash theme={null}
cd ComfyUI/custom_nodes/comfyui-manager
git pull
```
Then restart ComfyUI.
## Legacy installation methods
To install ComfyUI-Manager in addition to an existing installation of ComfyUI:
1. Navigate to `ComfyUI/custom_nodes` directory in terminal
2. Clone the repository:
```bash theme={null}
git clone https://github.com/Comfy-Org/ComfyUI-Manager comfyui-manager
```
3. Install the manager dependencies:
```bash theme={null}
cd comfyui-manager
pip install -r requirements.txt
```
4. Restart ComfyUI
1. Install [Git for Windows](https://git-scm.com/download/win) (standalone version, select "use windows default console window")
2. Download [install-manager-for-portable-version.bat](https://github.com/Comfy-Org/ComfyUI-Manager/raw/main/scripts/install-manager-for-portable-version.bat) into your `ComfyUI_windows_portable` directory
3. Double-click the batch file to install
comfy-cli provides various features to manage ComfyUI from the CLI.
**Prerequisites**: Python 3, Git
**Windows:**
```bash theme={null}
python -m venv venv
venv\Scripts\activate
pip install comfy-cli
comfy install
```
**Linux/macOS:**
```bash theme={null}
python -m venv venv
. venv/bin/activate
pip install comfy-cli
comfy install
```
See also: [comfy-cli documentation](/comfy-cli/getting-started)
**Prerequisites**: python-is-python3, python3-venv, git
1. Download [install-comfyui-venv-linux.sh](https://github.com/comfy-org/ComfyUI-Manager/raw/main/scripts/install-comfyui-venv-linux.sh) into an empty install directory
2. Run:
```bash theme={null}
chmod +x install-comfyui-venv-linux.sh
./install-comfyui-venv-linux.sh
```
3. Execute ComfyUI with `./run_gpu.sh` or `./run_cpu.sh`
**Installation precautions:**
* ComfyUI-Manager files must be accurately located in the path `ComfyUI/custom_nodes/comfyui-manager`
* Do not decompress directly into `ComfyUI/custom_nodes` (files like `__init__.py` should not be in that directory)
* Do not install in paths like `ComfyUI/custom_nodes/ComfyUI-Manager/ComfyUI-Manager` or `ComfyUI/custom_nodes/ComfyUI-Manager-main`
This documentation is built and hosted on [Mintlify](https://mintlify.com), a developer documentation platform.